整体上分三步走,第一步识别筛选出要控制的连接和数据包,第二步设置好要套用的限速模板,第三步应用匹配的限速模板到对应的连接中。
要让Queue生效需提前关闭Fasttrack,在防火墙过滤列表中提前删除相关条目。
本次实例思路为设置PING,DNS流量为最优,小包及网页流量其次,其他流量最次。末尾有提供脚本下载链接,文中所述脚本片段只为便于理解。
一、使用Mangle标记各类型流量
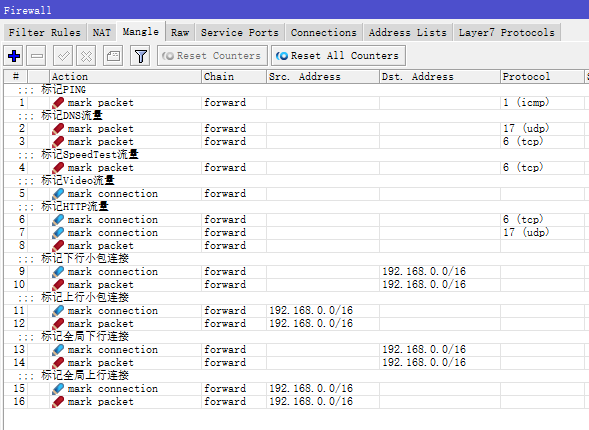
具体脚本命令如下:
/ip firewall mangle
add action=mark-packet chain=forward comment="Mark Ping" \
    new-packet-mark=PING passthrough=no protocol=icmp
add action=mark-packet chain=forward comment="Mark DNS Query" \
    new-packet-mark=DNS_P passthrough=no port=53 protocol=udp
add action=mark-packet chain=forward comment=\
    "Mark SpeedTest" new-packet-mark=SpeedTest \
    passthrough=no port=8080 protocol=tcp
add action=mark-connection chain=forward comment=\
    "Mark Web Traffic" new-connection-mark=WebC passthrough=yes \
    port=80,443 protocol=tcp
add action=mark-connection chain=forward new-connection-mark=WebC passthrough=yes \
    port=80,443 protocol=udp
add action=mark-packet chain=forward connection-mark=WebC new-packet-mark=\
    WebP passthrough=no
add action=mark-connection chain=forward comment=\
    "Mark MiniPackets Down" dst-address=\
    192.168.0.0/16 new-connection-mark=MiniCDown packet-size=0-512 \
    passthrough=yes
add action=mark-packet chain=forward connection-mark=MiniCDown dst-address=\
    192.168.0.0/16 new-packet-mark=MiniPDown passthrough=no
add action=mark-connection chain=forward comment=\
    "Mark MiniPackets Up" new-connection-mark=\
    MiniCUp packet-size=0-192 passthrough=yes src-address=192.168.0.0/16
add action=mark-packet chain=forward connection-mark=MiniCUp new-packet-mark=\
    MiniPUp passthrough=no src-address=192.168.0.0/16
add action=mark-connection chain=forward comment=\
    "Mark General Down" dst-address=\
    192.168.0.0/16 new-connection-mark=GenDownC passthrough=yes
add action=mark-packet chain=forward connection-mark=GenDownC dst-address=\
    192.168.0.0/16 new-packet-mark=GenDownP passthrough=no
add action=mark-connection chain=forward comment=\
    "Mark General Up" new-connection-mark=\
    GenUpC passthrough=yes src-address=192.168.0.0/16
add action=mark-packet chain=forward connection-mark=GenUpC new-packet-mark=\
    GenUpP passthrough=no src-address=192.168.0.0/16
以上脚本标记了PING流量,DNS流量,SpeedTest流量,HTTP流量,下行小于512字节的流量,上行小于192字节的流量和其他流量。脚本中应用于192.168.0.0/16内网地址,可根据实际进行调整。
例 新增配置Web流量标记如下:
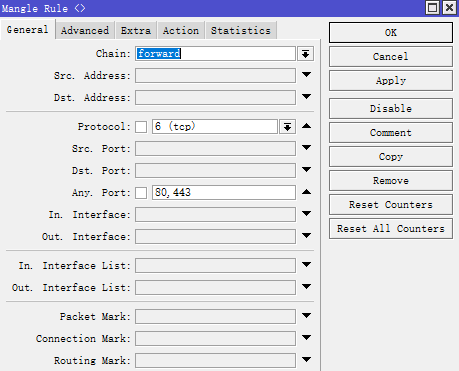
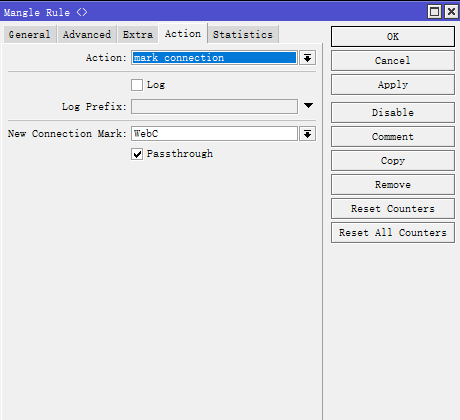
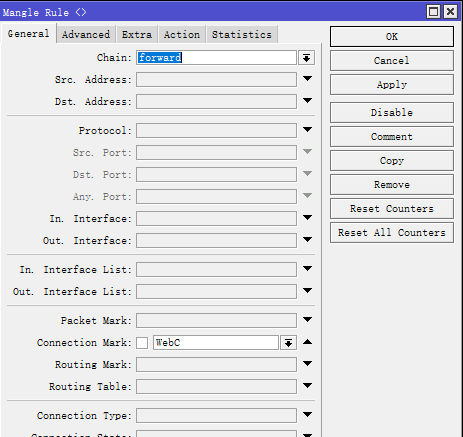
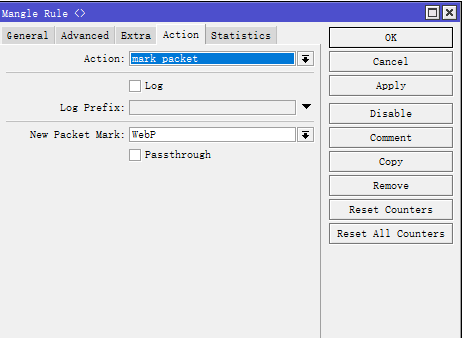
以上即完成对Web流量的标记
二、Queue中添加队列类型
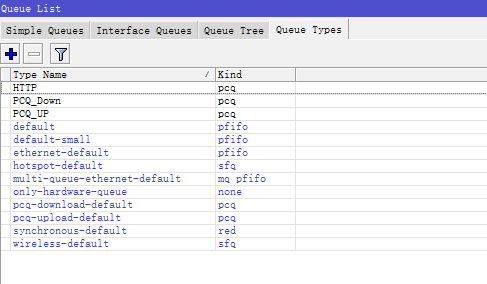
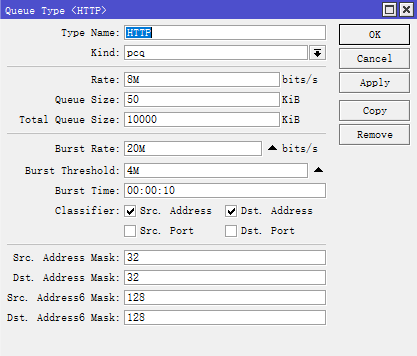
具体脚本命令如下:
/queue type
add kind=pcq name=Gen_Down pcq-classifier=src-address pcq-rate=12M \
    pcq-total-limit=20000KiB
add kind=pcq name=Gen_UP pcq-burst-time=20s pcq-classifier=src-address \
    pcq-rate=20M pcq-total-limit=10000KiB
add kind=pcq name=Web pcq-burst-rate=20M pcq-burst-threshold=8M \
    pcq-classifier=src-address pcq-rate=12M pcq-total-limit=\
    10000KiB
具体限速值需根据实际情况进行调整,可导入脚本后自行在图形界面修改。
三、在队列树Queue-Tree中调用限速模板
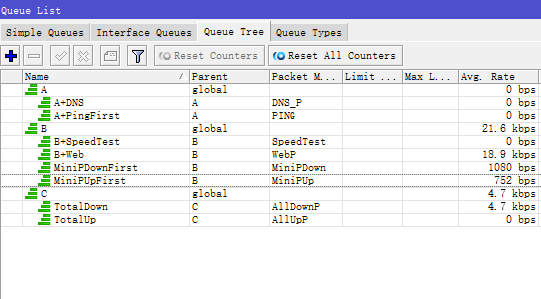
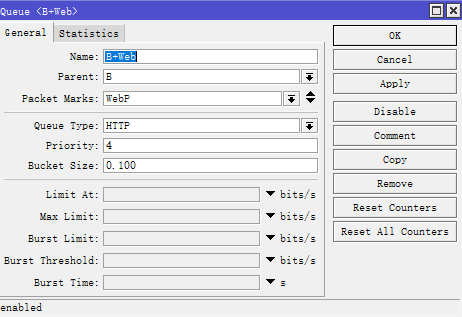
具体脚本命令如下:
/queue tree
add name=A parent=global
add name=DNS packet-mark=DNS_P parent=A priority=1
add name=PingFirst packet-mark=PING parent=A priority=1
add name=B parent=global
add name=MiniPDownFirst packet-mark=MiniPDown parent=B priority=2
add name=MiniPUpFirst packet-mark=MiniPUp parent=B priority=2
add name=SpeedTest packet-mark=SpeedTest parent=B priority=3
add name=Web packet-mark=WebP parent=B priority=4 queue=Web
add name=C parent=global
add name=GenDown packet-mark=GenDownP parent=C queue=Gen_Down
add name=GenUp packet-mark=GenUpP parent=C queue=Gen_UP
该段脚本链接了各种之前已标记的数据包和对应的限速模板,PING包优先级1,不限速;DNS数据包优先级1,不限速;小包下行优先级2,不限速;Web包优先级4,执行Web限速;其他流量包优先级8,执行全局限速。
四、通过导入脚本快速配置
下载限速脚本

终端中执行 im file=qos.rsc 即导入设置完成,可在队列树右侧查看匹配次数是否生效。


文章评论
教程很棒 就是现在下载大多都是走443流量
感谢,很棒!